I wrote before about my experiences at Penland this summer, but I have yet to show off what I actually made! If you’ve been waiting, I finally found some time to take good photos of my projects.
I attended the Ondulé Weaving class, taught by Amy Putansu. Ondulé is a very special weaving technique I was super excited to learn about. Ondulé – meaning “wavy” or “corrugated” in English – weaving is done by using a special reed to create curved lines in the warp threads. Most loom weaving is considered very grid like. You have vertical (warp) threads and horizontal (weft) threads that always meet at 90deg angles. There are techniques you can use to create the illusion of curves in a woven piece, but the threads themselves are always straight and parallel; except in ondulé weaving!
Weaving on a floor loom uses a piece of equipment called a “reed.” They are usually made of stainless steel in these modern days, and consist of many tiny bars of steel set evenly. Each thread in the warp goes in between these bars to keep them evenly spaced across the width of the cloth. The reed is also used in conjunction with the “beater” to “beat down” each weft thread as it is cast. The bars in a standard reed are always parallel, and always evenly spaced – that is the point! But an ondulé reed, often called a “fan reed,” is different.


As you might have guessed from the name, the bars in a fan reed are set into fan shapes. They are not parallel, but instead group together in crammed and spaced areas. By raising and lowering the reed, or the warp going through the reed, you can control how the individual warp threads are crammed together or spaced apart. By carefully orchestrating where in the vertical space of the reed you beat your cloth, you can create “undulations” in your weave structure. The warp threads are being guided back and forth in a wavy shape, sometimes squished together and sometimes spaced apart, and held in place by each successive weft beat.
I was so thrilled to take this class. It was something I’d come across in passing, but could never find more information about. How do you weave ondulé? Where do you buy equipment? What’s the magic sauce? Are some fibers better than others? How can I weave this?!?! Ondulé weaving is something of a mystery, there isn’t a lot of information out there about it. Very recently, in fact after our class ended, a book about ondulé weaving was released by Schiffer Publishing: Ondulé Textiles. It’s a great place to go for more inspiring photos and some of the history of ondulé weaving.
Amy Putansu was a pretty amazing teacher, and she taught a great workshop. We were at Penland for a full 16 days. The first week of the workshop, Amy had organized a “round robin” style rotation on the looms. Each loom was set up with a different size of fan reed, and different fiber-type yarns in different arrangements. The idea was that we could learn the basics of how to manipulate the reeds and our yarn, while also experimenting with all the different looks that can be achieved. This was an amazing way to learn and experience some of the possibilities, without having the anxiety attached to also trying to plan a full project start to finish before even knowing how ondulé works.
In my first penland post, I shared these photos of a set of greeting cards we made for the end-of-session auction. Each card features a different sample of fabric woven by one of us in that round robin part of the workshop. This gives you an idea of the different yarns and setts and colors Amy had prepared for us, and how much we all enjoyed experimenting.


After the round robin was completed, we spend the final week of the workshop planning and creating our own project.
Planning and ondulé project was pretty intimidating for me. Thread “sett” is a very important concept in weaving, and is basically a way of talking about the density of your yarn. You can imagine that the weight and fiber type of a yarn is important and impacts how many warp threads per an inch you’ll want to set up in your loom. With ondulé weaving that becomes even more important, because at some points in your cloth your warp will be very dense. At the “bottom” of some fans, you can see how close the reed will push your threads together. And of course, at the other side of the fan, your threads will be very spaced apart. The angle of the fans is also important, because that impacts how dramatically the warp threads at the “outside” of each fan area will be forced to curve. Those threads will have to travel more distance, curving in and out constantly, than the threads in the “center” of each fan which don’t curve at all. This means that your chosen yarn must be strong, and be able to handle differing levels of tension. All of which is a lot of words to say: ondulé weaving is hard! And I was very glad to have an experienced teacher there to help guide our choices.
I ended up completing two projects in the time we had. For my first project, I chose something based on one of my favorite experiments I had played with during the round robin. Not only did Amy guide us in the basics of onudlé weaving, but she also used the round robin as an opportunity to show us countless other fascinating weaving and fiber techniques. Everything from dyeing, to felting and felt resist, to warp painting, to devoré (burning out select fibers with acid or base solutions), and more! One of my favorite techniques was the warp painting we did with dye-na-flow. I intend to write an entire blog post about this one technique eventually, but for now just know that it consists of painting your warp threads while they’re on the loom. This simple concept blew my mind. I could make it up as I went along? I could just go with it, splash down color wherever and however I wanted? This was my kind of fiber dyeing!
Like I said, ondulé weaving is hard! It takes a lot of work to achieve that “undulating” warp, and so usually the weaver wants to choose a design that really shows off the curved nature of the fibers. For my first project, I chose a simple solid white rayon warp and used the same yarn for weft. Everyone in the class looked at me like I was crazy, until I explained that I wanted to really exaggerate the curves in the threads by painting them as I went. And of course, knowing me, I couldn’t do it without also including some reflective threads! I don’t have a whole lot of photos of the scarf in progress, or after completion. I ended up donating this piece to the end-of-session auction. I was super proud of it though, and hope to complete another one on my home loom eventually.


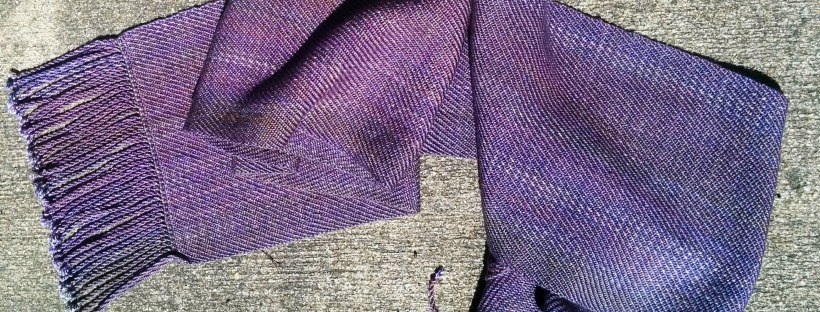
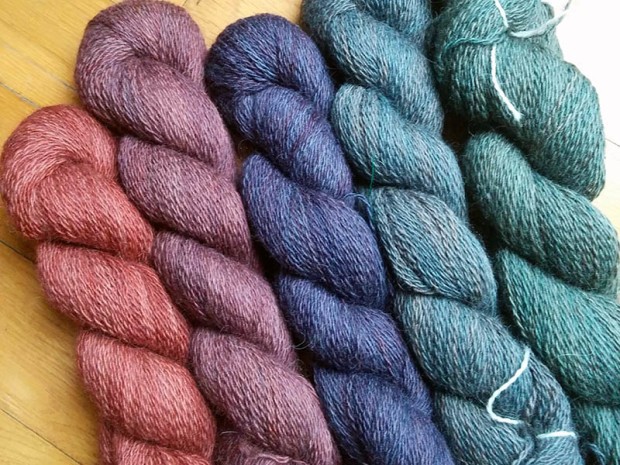
After my success with that scarf, I wanted to experiment with something a little more exciting than white rayon. I’d been holding onto some absolutely gorgeous malabrigo silk-alpaca blend yarn for awhile, just waiting for the right project. I was pretty sure it would be great yarn for an ondulé project.
I used two colors of yarn for this project: a solid teal-blue color (called “teal feather”) and a variegated yarn that transitioned between spring green and hints of violet and blue (called “indicieta”). I planned out my warp carefully, because I wanted the two yarn colors to create noticeable stripes that would highlight the curved nature of ondulé, but I also wanted to show a transition. I was inspired by watching the mountains that surrounded the school. They were never the same color twice, morning or afternoon, foggy or sunny, always changing every time you looked at them. I wanted to capture some of that feeling, of staring at verdant mountains in summer. I used the same transition effect in the weft. Each fringe end of the scarf emphasizes the teal yarn, while the center portion emphasizes the spring green indicieta yarn.


This scarf is my favorite hand made item I’ve ever made. It uses a unique skill I spent a lot of time learning. It’s in my favorite colors. The undulating shapes in the weave remind me of the mountains where I grew up, and that surrounded the school where I made it. The colors it uses also surrounded me during those weeks at Penland – vivid summer greens, with hints of blue and purple twilights and pink dawns. I’m so excited that its finally getting cold enough to wear it!


I will absolutely be weaving more ondulé in the future. I hope to eventually document the technique that Amy taught us, because such a wonderful and unique style of weaving shouldn’t be lost or limited. I am very grateful that Amy chose to teach us, and that I could attend her session at Penland. I heartily recommend her as a teacher to anyone who gets the chance to learn from her.